Y'all are giving me incentive to run it again.
At least I already have a fish scale (somewhere).
I'll have to make a new carriage for it. I do have a smooth
level floor in my garage (my Laboratory is too cluttered).
I can point it out the door and run it to get the thrust measurement.
I will not be able to do it immediately, but I did design the
engine mounts with the intent to put a simple axle and some
rollerblade wheels on it. Just don't be in a hurry. I'll be chomping
at the bit to do it, but it will have to be a low priority.
Right now I'm just trying to cool down from spending the day
in the sun at Bikes, Bluegras & BBQ (an event hosted by my church).
I think the pastor figured having me drive the shuttle van would
get people praying for sure!
If I get cooled down I'll go find my fish scale and some axles
and wheels. It shouldn't take much to take the engine off of the
wooden frame either. If I chip away at it during the week
maybe I can run it in a week or two.
Elektra II Runs Unbelievably Well!!
Moderator: Mike Everman
-
larry cottrill
- Posts: 4140
- Joined: Sun Oct 05, 2003 1:17 am
- Antipspambot question: 0
- Location: Mingo, Iowa USA
- Contact:
Saw The Movies
All right, Mark - now I've actually seen the videos. Very impressive, indeed!
When you get a chance, please take careful measurements and post the final "as built" dimensions, INCLUDING how much the sides are domed out.
Again, congratulations, sir! Find out if you can demo your engine for a church youth group outing or something!
L Cottrill
When you get a chance, please take careful measurements and post the final "as built" dimensions, INCLUDING how much the sides are domed out.
Again, congratulations, sir! Find out if you can demo your engine for a church youth group outing or something!
L Cottrill
-
Irvine.J
- Posts: 1063
- Joined: Mon Jun 05, 2006 4:28 pm
- Antipspambot question: 0
- Location: Brisbane, Australia
- Contact:
Electra II
Mark I just saw the videos, I just wanted to say thats an impressive build, well done mate, she is fantastic. She certainly runs hard doesn't she, I look forward to many great builds in the future.
Well done.
Well done.
 [/url]
-
Mark 42
- Posts: 125
- Joined: Tue May 08, 2007 6:45 pm
- Antipspambot question: 0
- Location: Puget Sound
- Contact:
Re: Saw The Movies
I think my son will be doing a show & tell at his school... I'll haveLarry Cottrill wrote:All right, Mark - now I've actually seen the videos. Very impressive, indeed!
When you get a chance, please take careful measurements and post the final "as built" dimensions, INCLUDING how much the sides are domed out.
Again, congratulations, sir! Find out if you can demo your engine for a church youth group outing or something!
to give the teacher Bruno's article to study beforehand.
Basically, my changes were:
Overall length increased to 35.75 inches.
Sides of combustion chamber domed (see below).
Intake does not protrude into combustion chamber.
Intake is bent with an EMT bender instead of an angled kink.
Intake length along centerline is increased to 7.15 inches.
Spark plug moved directly across from intake.
Tailpipe exit has a flare.
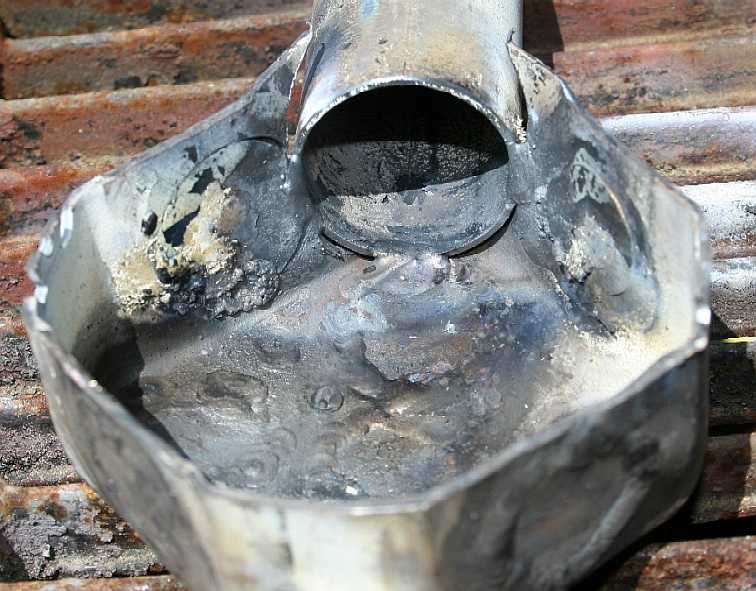
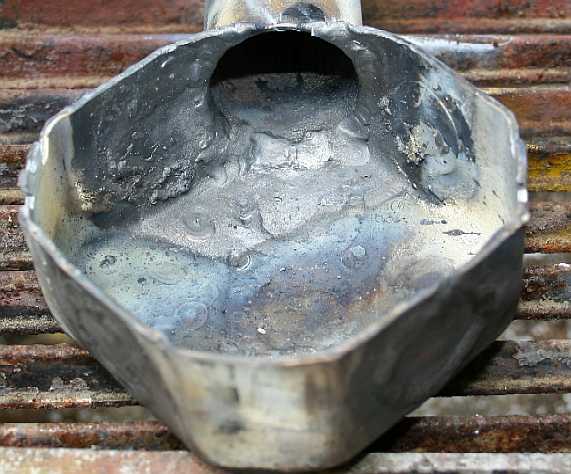
To dome the sides of the combustion chamer, after welding in
all of the knock-outs in the octagon shaped electrical box
I laid it on some sand and pounded its bottom with a large
hammer to increase the volume of the box. I then did the same
to the lid of the box. Heating with a torch and pounding while
hot makes it easier. I'll take some measurements when I get
a chance. I'm at home sick this morning, but will probably
go to work after I see my doctor, so time may not permit
today, unless the doctor is too late in the day to justify
going to work for the remainder.
The next one I make I will use a 1.5" length of 4"diameter
pipe and two flat plates in place of the octagon box. I might
even try using compressed air to dome the combustion chamber
sides. If I get the flat plates hot enough and fill the sealed
combustion chamber with compressed air I should be able to
dome it. I can plug the intake & exhaust and put the air in
through the spark plug hole. It might not be easier than pounding
a dome shape, but more elegant.
I guess I need to start drawing.
I'll draw up what I built, and then what I propose as an easier
to build combustion chamber (welding those knock-out is tedious)
I need to get more actylene too - I'm down to nearly zero now.
-
larry cottrill
- Posts: 4140
- Joined: Sun Oct 05, 2003 1:17 am
- Antipspambot question: 0
- Location: Mingo, Iowa USA
- Contact:
Re: Electra II
Mark and James -Irvine.J wrote:Mark I just saw the videos, I just wanted to say thats an impressive build, well done mate, she is fantastic. She certainly runs hard doesn't she, I look forward to many great builds in the future.
Well done.
Once I figured out how to start her up, I too was impressed with how well this engine runs (and Mark's has several improvements over my original). Just re-orienting the chamber made it at least 100 percent better than the Elektra I that was my first running engine. Looking back on it now, it's funny how I found the EII so hard to get going - but I was a little short on the overall length at first, of course.
Anyway, the way you've built yours, Mark, makes it a really nice first engine for beginners to tackle - as long as they don't mind welding up all those little holes and knockouts in the box!
Weird as it may seem, this is one of the engines I thought about making kits for - just for beginning builders - providing pre-welded front ends. That would eliminate a lot of the "busy work" and get a tyro going quickly.
L Cottrill
-
Mark 42
- Posts: 125
- Joined: Tue May 08, 2007 6:45 pm
- Antipspambot question: 0
- Location: Puget Sound
- Contact:
I wonder if there are octagon boxes w/o so many knockouts.
I seem to remember some boxes without a bottom... it would
be easier to weld on two lids.
But the I think the idea of a 1.5" length of 4" exhaust pipe with
two lids would be easier. It wouldn't be a bad kit either. You
could dome the lids and weld then on and weld on the boss for
the spark plug. But I actually like having the combustion chamber
open when I weld the inlet and outlet pipes so I can see what
it looks like. I welded the outled from the inside and ground
away a couple of irregularities to make it a smoother transition.
You can see this if you click on the pictures in my message thread
about the build, though the lighting just makes it look really rough
in most of the pictures. That was why I painted it black and took
a couple of pictures just before I closed it up.
-
Irvine.J
- Posts: 1063
- Joined: Mon Jun 05, 2006 4:28 pm
- Antipspambot question: 0
- Location: Brisbane, Australia
- Contact:
Electra II
Yeah Larry thats a great Idea, I mean I just can't believe how easy that was, I mean... WOW! Hahaha. Make sure you leave them with some welding and sourcing of parts required :D Simply finding the people to give you the best price on tubes and things as such is 1/2 the battle. These would be very popular indeed. Sorry I couldn't help with those starters though, I did manage to rig something up though post on it shortly.
-
Jim Berquist
- Posts: 1396
- Joined: Thu Oct 06, 2005 1:34 am
- Antipspambot question: 0
- Location: DEMING NM 88030
-
larry cottrill
- Posts: 4140
- Joined: Sun Oct 05, 2003 1:17 am
- Antipspambot question: 0
- Location: Mingo, Iowa USA
- Contact:
Banjo Jet
Actually (in my view) a circular chamber, though workable, wouldn't be as good. With the box, you have a clearly defined nozzle area of reasonable angle. The circular wall would be a much more abrupt entrance into the tailpipe. You should try one that way, and see how they compare as they run.Mark 42 wrote:But the I think the idea of a 1.5" length of 4" exhaust pipe with two lids would be easier. It wouldn't be a bad kit either. You could dome the lids and weld then on and weld on the boss for the spark plug.
Another way to do the tailpipe attachment was suggested by rocket builder Gene Border, and I think it's pretty workable: You make the chamber outlet port a little oversize, so the tailpipe has a "rattling fit" - ha! Then you flare the FRONT end of the tailpipe so it won't drop through, and pass it in from the inside of the chamber till it contacts the rear chamber wall. Then, weld around the outside. The inner flare rides the wall pretty closely, making a nice, smooth entrance path - AND this gives you super easy assembly (you can line it up nicely after initially tack welding it). That's how I'd try my next one (if there is a next Elektra) and again, it would work well for kit builders if you provided the pipe flared that way. If I were doing it again, I think I would just file the intake port elliptical and take the intake pipe straight in, Thermojet style.
"Simplify, simplify." - Thoreau
L Cottrill
-
Jim Berquist
- Posts: 1396
- Joined: Thu Oct 06, 2005 1:34 am
- Antipspambot question: 0
- Location: DEMING NM 88030
Elecktra II
WHAT TO FRAP, IT WORKED![url=callto://james.a.berquist] [/url]
[/url]-
larry cottrill
- Posts: 4140
- Joined: Sun Oct 05, 2003 1:17 am
- Antipspambot question: 0
- Location: Mingo, Iowa USA
- Contact:
Re: Elecktra II
Well, I don't know ... Seems like the last thing was suggesting he use a sleeve to play with the tailpipe length and then I lost touch with him. I'll have to go back and see if I can figure out where we were, and how to contact him.berquistj@peoplepc.com wrote:Did this guy ever get his going?
http://www.youtube.com/watch?v=h5hk0XxzZDw
Jim
Thanks for bringing this back to my attention! This one was a nice build, and really looked like it should have run.
L Cottrill
-
Mark 42
- Posts: 125
- Joined: Tue May 08, 2007 6:45 pm
- Antipspambot question: 0
- Location: Puget Sound
- Contact:
Re: Banjo Jet
I actually did that initially on this engine, but the thickness of the electricalLarry Cottrill wrote:Another way to do the tailpipe attachment was suggested by rocket builder Gene Border, ...you flare the FRONT end of the tailpipe so it won't drop through, and pass it in from the inside of the chamber till it contacts the rear chamber wall.
box was not enough to accomodate the 1-1/4 diameter EMT with the flare,
so I cut most of the flare off.
As always, click on the image for a larger version


-
Mike Everman
- Posts: 5007
- Joined: Fri Oct 31, 2003 7:25 am
- Antipspambot question: 0
- Location: santa barbara, CA
- Contact:
-
Jim Berquist
- Posts: 1396
- Joined: Thu Oct 06, 2005 1:34 am
- Antipspambot question: 0
- Location: DEMING NM 88030
elekra II
I bet that will scamper better then my biggist cockroach..
Anyone want to wager? I say 4lbs...What is the engine weight? Hell it may be able to fly!!!!
Jim
Anyone want to wager? I say 4lbs...What is the engine weight? Hell it may be able to fly!!!!
Jim
WHAT TO FRAP, IT WORKED![url=callto://james.a.berquist][/url]
[/url]