1st pulse jet
Moderator: Mike Everman
-
- Posts: 5
- Joined: Tue Dec 12, 2006 2:30 am
- Antipspambot question: 0
- Location: Sunny South Florida
- Contact:
1st pulse jet
Well, I've looked into building a jet for so long and finally decided to build one. I didnt use anything but pictures for referances and this is what I came up with... I have no clue of what kind of thrust this thing puts out, i still havent given it full throttle. A crappy camera is used, but you guys get the concept.
Oh and I have less than 3 hours into the entire build. everthing included, and less than $30
Here is a video
http://s32.photobucket.com/albums/d17/x ... CN0405.flv
Oh and I have less than 3 hours into the entire build. everthing included, and less than $30
Here is a video
http://s32.photobucket.com/albums/d17/x ... CN0405.flv
Last edited by zero-stealth on Fri Dec 22, 2006 6:05 pm, edited 1 time in total.
1st Pulse-jet
I think your engine looks great.
It should run just fine, but you may find it helpful to to use two BBQ tanks or a forklift tank to fuel a motor that big.
I like the way you joined the straight sections with flares -- very quick to build that way and no cone rolling required. Do you own a muffler shop?
Dave
It should run just fine, but you may find it helpful to to use two BBQ tanks or a forklift tank to fuel a motor that big.
I like the way you joined the straight sections with flares -- very quick to build that way and no cone rolling required. Do you own a muffler shop?
Dave
!st Pulse-jet
...Was looking at your pictures again...just a bit of advice, feel free to ignore it or take it with a grain of salt...But when you get that engine really going, so that it's glowing orange, you may have trouble with the heat affecting (softening) your black neoprene fuel hose. It will help to distance the line from the motor. You might consider adding a one-to-three foot length of Copper tubing between the motor and your existing fuel line for safety. Or you could wrap the existing line with Aluminum foil. It's not fun having the fuel line let go unexpectedly and spray propane around the area while you're nearby trying to run your motor. It's happened to me...
1st Pulse-jet
One last bit of (unsolicited) advice and then I'll leave you alone...
It looks like you're using standard electrogalvanized muffler tube for your motor. I'm sure you're probably aware that TIG welding Zinc-plated metals is bad for your health.
I etch the Zinc off before welding with an acid dip. Some guys here use vinegar but that takes up to 24 hours. I use a saturated solution of Sodium Bisulfate. You can get it in dry powder form at any pool or spa supplier. It's usually called "pH Minus", or something to that effect. Just read the label and make sure it says Sodium bisulfate. You can also use Hydrochloric acid, but that's a little nastier, and less common. Mix the Sodium bisulfate crystals in a shallow plastic container of water until no more will dissolve. Then put just the section where you plan to weld into this tank and let it sit for about 5-15 minutes, outside, while it bubbles off Hydrogen. As the bubbles collapse when they reach the surface they will also carry away microscopic droplets of this acid solution, so make sure you do this outdoors. When the bubbling stops, remove your part, rinse and dry it and you're ready to weld in 20 minutes instead of 24 hours.
Don't worry if you leave parts in the solution too long. I've left them in there for several hours and it didn't attack the underlying steel; Hydrochloric acid is not quite so forgiving which is another reason I don't use it.
After stripping the Zinc galvanizing in this way the parts (weld seams) will rust quickly (w/in 24 hours), so do this just before you're ready to weld.
If you etch back just a half inch from the weld seam in each direction you can TIG the parts together without creating Zinc fumes. This also makes for a cleaner weld since Zinc causes spatter as it burns when you TIG weld it, and it contaminates your electrode as well.
Again, nice engine, play safe, and have fun!
Dave
-
- Posts: 5
- Joined: Tue Dec 12, 2006 2:30 am
- Antipspambot question: 0
- Location: Sunny South Florida
- Contact:
Dave_G - It already runs great with just 1 tank.
and as for own the shop, not yet but real soon I will. Full time access to a mandrel bender and all the other equipment is nice.
francisco - Im sorry, I dont understand your wording to answer your questions...
hagent - It is on a stand and up against the lift in my shop in one pic and a lip in the concrete in the other, it has started to dance a bit sideways at 3/4 throttle and I havent gone above that.
Dave_G - I welcome your input, The neoprene hose was just to start experimenting with the jet, not for permenant use. I dont have any other jet engine knowledge other that what Ive gpne through on here from the last 2 weeks.
And its not galvanized, its aluminized steel. I know all about the toxic fumes of galvanized. I know all about welding, I can stick, tig, mig, flux core, etc.... anything (well I havent experimented with magnesium or titanium yet)
The link is a poor quality video of the first day I tried and succeeded getting it to run
Re: 1st Pulse-jet
zero-stealth wrote:It already runs great with just 1 tank.
And its not galvanized, its aluminized steel. I know all about the toxic fumes of galvanized. I know all about welding, I can stick, tig, mig, flux core, etc....
Very good. In the photos, some tubing looked aluminized, and some looked galvanized. Sorry for my confusion.
I just saw your video. Can't wait to hear what thrust you get when you measure it. Is that combustion chamber 5" dia. or 6" dia. or what?
-
- Posts: 5
- Joined: Tue Dec 12, 2006 2:30 am
- Antipspambot question: 0
- Location: Sunny South Florida
- Contact:
I understand, I had to add in an 8" piece between the u bend and CC to get it running.
Its a 5" pipe 12" length (what was lying around)
I dont even know where to begin to measure the thrust. New to jets but great welding and fabrication skills and having a mandrel bender makes things pretty easy going.
This is just some experimenting, I have a garrett T3 waiting for its turn with a little more knowledge and funds.
Re: 1st Pulse-jet
You can make a very simple thrust stand from one of those cheap (Harborfreight.com -- "steel mesh deck wagon" ITEM 38137-3VGA) four-wheeled garden carts with pneumatic tires.
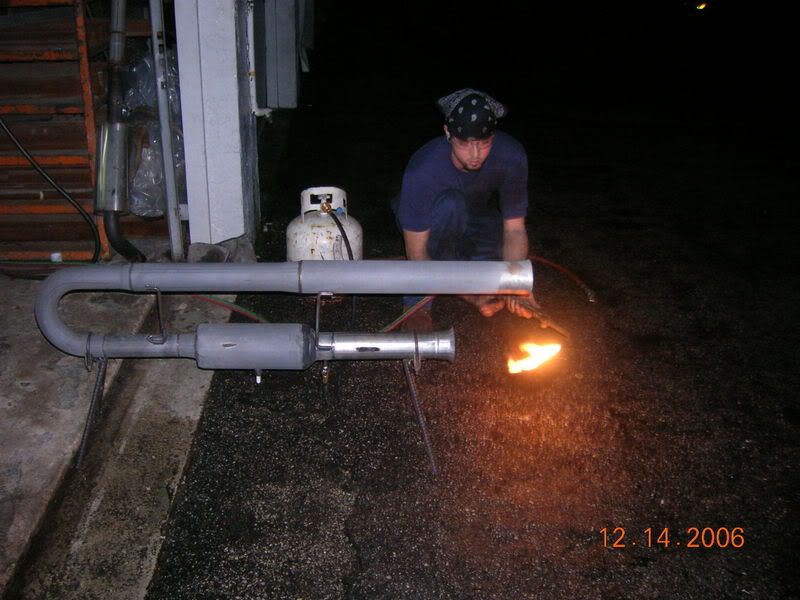
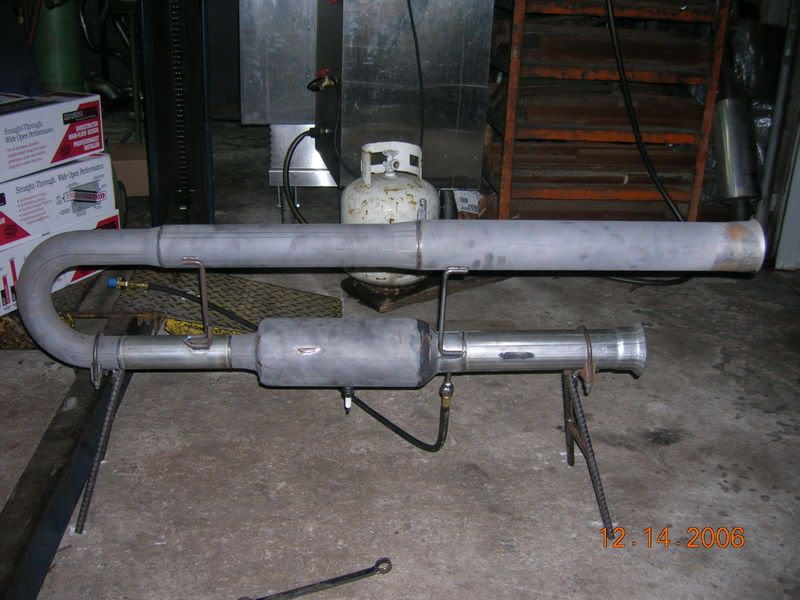
zero-stealth wrote:I dont even know where to begin to measure the thrust. New to jets but great welding and fabrication skills and having a mandrel bender makes things pretty easy going.
I took one of these carts, plasma-cut off the perf metal bed, and welded a 4-foot long piece of four-inch C-channel to the leftover running gear to use as an engine mount. I attached a spring scale to the cart, and then ran a steel cable from the other end of the scale to anything heavy (like the trailer hitch on my truck). It's portable and cheap.
All you really need is anything that rolls and is stable enough to hold your engine, a spring scale and a cable to anchor it all. The engines I've tested with this stand have all been far away enough from the tires that heat hasn't been an issue. And the pneumatic tires roll better on asphalt than hard tires would so I have more options for test locations.
I don't think you'll have much trouble coming up with something. If you get it running at high power, an engine your size could put out about 50 lbs of thrust. Don't be disappointed if you only get 10-15 on your first try. Like I said before, you're probably going to need to be able to feed it more propane than will flow through that single BBQ tank valve before you can get 50 lbs or so out of your design.
Let us know though -- I'd love to be proven wrong on this account ;-)
- Attachments
-
- deckwagon.gif (31.11 KiB) Viewed 13481 times
-
- Posts: 5
- Joined: Tue Dec 12, 2006 2:30 am
- Antipspambot question: 0
- Location: Sunny South Florida
- Contact:
Thats would be an interesting scale. I have a harbor freight right down the street from me, I was going to buy some pneumatic tires from there and make my own frame for a go kart. I know I can get a spring scale along with it to get some figures to throw around.
And I agree that 1 propane tank will not be sufficient enough to get max thrust, But I would gaurantee more than 10-15 lbs thrust from the one tank im running now. a second tank with a manifold would surely only help this PJ.
The biggest problem I face is I dont have many places I can run this thing. Just at my shop and still not for too long, Dont want to have the cops coming around.
Thanks for the help
Noise pollution
It's funny to have a hobby that attracts the police. There's a Harbor Freight in town here too. The Chinese are taking over.
Mark
Mark
Presentation is Everything
Re: 1st Pulse-jet
Here's what mine looks like:
As I said I replaced the cart's original perf-metal deck with a 4-inch C-channel and welded half-round's on the underside to help hold various engines in place.
When testing, I can change out an engine in a few minutes this way. I use those vise-grip chain clamps (also from Harbor Freight) to hold various engines in place instead of hose clamps because they're very quick to set and release.
A small 50-lb spring scale is attached to the front of the cart, and then an anchor cable.
- Attachments
-
- cart_w_sample_motor_mounted.JPG (84.6 KiB) Viewed 13318 times
-
- quick_clamp.JPG (123.92 KiB) Viewed 13318 times
-
- cart_w_spring_scale.JPG (149.06 KiB) Viewed 13318 times